
Wednesday, May 8, 2013


Tuesday, May 7, 2013
Fiddleheads


If you'd like to give fiddleheads a shot at home, try this simple, delicious recipe:
Ingredients:
1 cup fiddleheads
2 cloves garlic
Lemon
Salt
Pepper
Butter or coconut oil
Directions:
Wash fiddleheads and trim stems to about 1". Bring water to boil, and cook fiddleheads for about a minute before transferring to a pan. Sauté fiddleheads with minced garlic and butter or coconut oil until they begin to brown. Add salt and pepper to taste. Squeeze lemon juice over fiddleheads just before removing them from the pan. Serve warm and enjoy!

Monday, May 6, 2013
Seattle Girls Trip
 |
 |
 |
 |
 |
 |
 |
 |
Images above (left to right):
- Beautiful Lake Crescent in Port Angeles, Washington
- Me & the bride to be, Adrien
- Adrien, Jill, & I on the street in Seattle
- Sol Duc Hot Springs in the Olympic National Park
- View from the ferry to Olympic National Park
- The beautiful bride :)
- Selfies on the ferry
- I hit up an antique mall (obviously) near the dock while we waited for the ferry
Happy Monday everyone!
Thursday, May 2, 2013
Five Proofs of Spring
1. The birds have begun building nests under our porch eaves. It's hard to get good photos, as the birds move so fast and won't come around if I am standing on the porch, but I was able to snap this shot through the window from inside the house. Can you make out the little twig in the bird's mouth?

They appear to be at the beginning stages of building three or four nests. The nests are mostly dirt and moss at this point.
 2. The grass is finally green! Well, sort of. Large patches are still brown, but they will come around in the next few weeks.
 3. We're bringing seedlings outside. It's finally warm enough to bring them out without shocking the plants, so today we lined our young tomato plants up on the porch for a little sunning. I like to think of them as a row of ladies on the beach sunning themselves.

4. A number of bulbs and other yellow flowers in our yard are starting to bloom. I never realized what a mood lifter flowers are until this year!

 5. We can work outside. Josh has been digging a second garden plot along with a number of holes for five magnolia and dogwood trees we ordered from Arbor Day. Fern is a good lady, and hangs out in the grass with Josh while he works. Riley, on the other hand, slips off to the neighbor's house every time we turn our backs to taunt the dogs behind their fence. That little sneak.

Hope you are all enjoying beautiful spring weather. What are the markers that make it finally feel like spring to you?
They appear to be at the beginning stages of building three or four nests. The nests are mostly dirt and moss at this point.
4. A number of bulbs and other yellow flowers in our yard are starting to bloom. I never realized what a mood lifter flowers are until this year!
Hope you are all enjoying beautiful spring weather. What are the markers that make it finally feel like spring to you?
Wednesday, May 1, 2013
Bathroom Remodel Part 3: Tiling a Shower
Last night we tackled tiling the shower (both of us tiling for the first time ever), and were pleasantly surprised to find that it's quite straightforward and easy to do. Simple tiling requires patience more than anything else, and we were able to bang out the whole shower in a few hours.
Next we screwed a wood plank into the wall at the bottom of the shower wall and made sure it was level. We started our first row of tile right up against the plank to make sure we'd get a level line with our rows. Here's how it looked as we got started:
 Little by little we added more thinset to the wall, then tiled it over, making sure not to apply the thinset to such a large area that it would dry before we reached it with the tile.
 We opted for a two-over-one subway tile pattern, which meant that every other row started with a piece cut in half. Josh used a wet saw from Home Depot to cut the half pieces ahead of time so they were ready to go. We still have some custom cuts on the left edge and the grouting to complete, but here's how it looks right now:

The natural slate floor tiles we picked up at the quarry a few weeks ago will cover the shower curb as well as the bathroom floor. We are still undecided on a tile for the shower floor. The shower enclosure will be two simple unframed sheets of glass, one with a door on a hinge.
My inspiration for the shower design came from the below photo found on decor pad. So far I think we're doing pretty well. No, we don't have the fancy, extra long subway tiles or recessed lighting inside the shower, but I've still got a few tricks up my sleeve that I think will make the space really nice. Have any of you ever built & tiled a shower from scratch? Any lessons learned or handy tips to share from your experience?

My bathroom project for today is sanding the chipping paint off the old bathroom radiator with a wire brush bit attached to a drill. When the metal surface is sufficiently smooth I'll repaint the whole thing with a heat resistant paint. Once the radiator is done we'll move on to painting the walls before finally tiling the floor and shower curb. So excited to be making tangible progress down in the basement!
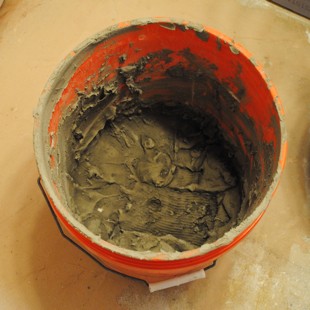
First Josh mixed the mortar, aka thinset, which adheres tile to vertical serfaces when applied directly to the wall and scraped with a special tool to create a texture for the tile to grab. We mixed 2.5 quarts water with 25 lbs of Flexbond, stirred the mixture for 5 minutes, then let it set for 5-10 min before applying to the wall in sections.
 |
 |
The natural slate floor tiles we picked up at the quarry a few weeks ago will cover the shower curb as well as the bathroom floor. We are still undecided on a tile for the shower floor. The shower enclosure will be two simple unframed sheets of glass, one with a door on a hinge.
My inspiration for the shower design came from the below photo found on decor pad. So far I think we're doing pretty well. No, we don't have the fancy, extra long subway tiles or recessed lighting inside the shower, but I've still got a few tricks up my sleeve that I think will make the space really nice. Have any of you ever built & tiled a shower from scratch? Any lessons learned or handy tips to share from your experience?
My bathroom project for today is sanding the chipping paint off the old bathroom radiator with a wire brush bit attached to a drill. When the metal surface is sufficiently smooth I'll repaint the whole thing with a heat resistant paint. Once the radiator is done we'll move on to painting the walls before finally tiling the floor and shower curb. So excited to be making tangible progress down in the basement!
Tuesday, April 30, 2013
Birdland & The City
 |
 |
 |
 |
 |
 |
 |
 |
Images above (left to right):
- Pink blossoming tree in Central Park
- View from our hotel room
- Native American Museum / I wanted to check out the rugs & textiles
- Dinner with old friends
- Yellowjackets playing at Birdland / That's my talented daddy-o at the piano
- Mannequin forms at Parsons New School for Design / I met my friend Marie there to be fitted for the wedding dress she is making for me. She was nice enough to fit my muslin dress between trying to complete multiple homework projects.
- Pet Stylist sign on the upper west side / Riley and Fern have never been to the stylist. Clearly I have been remiss with my hired out pet pampering duties.
- Flowers in Central Park
Thursday, April 25, 2013
Table Loom Weaving 101
Yesterday at weaving class we started on a tapestry woven on a mini table loom with wool thread. The loom is tiny, and my first piece on it is meant for experimentation, but I was able to warp it easily and begin a small Navajoish style piece.
The loom is basically a frame with 24 notches at each end and a bar that slides through the middle to grab the warp thread, allowing you to raise half of the threads at a time by tilting the bar forward or back. First we warped the loom by tying a knot around one notch, then winding the threads down and back until the frame was covered.


 And here's how it looks when the bar is inserted and tilted to raise half the thread:

Next we slid a piece of cardboard through the top to create some space for our fringe. We selected a thread color for the weft, then wrapped a wooden shuttle with our thread and began sliding it through the warp thread, alternating the tilt of the bar each time then pushing it toward the top of the loom after each pass to pack the rows together. Eventually I had several shuttles with different colors going and was able to make a few simple patterns.


My homework for this week is to finish the piece, then start another of my own if there is time. I will share the finished pieces when they are done if I manage to produce something that is not completely embarrassing :)
The loom is basically a frame with 24 notches at each end and a bar that slides through the middle to grab the warp thread, allowing you to raise half of the threads at a time by tilting the bar forward or back. First we warped the loom by tying a knot around one notch, then winding the threads down and back until the frame was covered.
Next we slid a piece of cardboard through the top to create some space for our fringe. We selected a thread color for the weft, then wrapped a wooden shuttle with our thread and began sliding it through the warp thread, alternating the tilt of the bar each time then pushing it toward the top of the loom after each pass to pack the rows together. Eventually I had several shuttles with different colors going and was able to make a few simple patterns.
My homework for this week is to finish the piece, then start another of my own if there is time. I will share the finished pieces when they are done if I manage to produce something that is not completely embarrassing :)
Subscribe to:
Posts
(
Atom
)