Sunday, December 30, 2012

Back Home

A decent sized storm rolled through Vermont while we were still in California, making for an interesting return home last night. Thankfully we had the foresight to have our road and driveway plowed while we were gone -- if it weren't for that plowing, the road would have been completely impassable. The problem came when we realized my car had been parked in such a way that the hired plower could not make turns to completely clear the driveway, and large snow banks were left in several crucial spots that required hours of hand shoveling.

Left with no other option, we bundled up in ski pants, gators, snow boots, and coats, and from 6-9:30 pm shoveled, struggled to mount the snow plow on the truck, plowed, dug out my car, got my car stuck in the snow, got Josh's truck stuck in the snow, sanded, and shoveled some more. The storm officially kicked our butts, and we looked like a pair of complete amateurs.

On the bright side, we've been schooled. We've now got our head around all the moving parts that must be considered in order to plow the drive without sliding off the road/getting stuck/hand shoveling. Let's just see how the next one goes!


Thursday, December 20, 2012

Winter Vacation


Today we are leaving snowy Vermont for sunny California to spend the holiday with my family. I'm taking a break from blogging and the vintage shop while we are on vacation, but will be back in January with new posts and more vintage wares. Have a happy and safe holiday, and see you all in the new year!

xo,
Claire, Josh, Riley, and Fern

Tuesday, December 18, 2012

The Basement Remodel Begins

One of the things we liked most about our house when we first saw it was the unfinished first floor/daylight basement. Both Josh & I love projects & we saw it as an opportunity to be creative and really make the space our own.

Half of the first floor will be left alone, as it is used for the water tank, oil burner, laundry, etc. The other half, which includes a bathroom, bedroom, den, and 3 season porch, will be remodeled into a guest area with a small office/TV hangout room in the den. The scope of the project is somewhat large, and involves the following:

Office/Den
  • Install new wood beam ceiling 
  • Install slate tile flooring
  • Frame, drywall, mud, and paint over cement walls
  • Install french doors between the den and bedroom to open up the space
  • Build a desk and shelving for the office area
  • Build a cabinet around the electrical panel to hide it

Hall/Stairs
  • Add a small wall to separate the "basement" side from the "guest" side
  • Stain and paint the stairs and hallway leading to the first floor
  • Slate tile in hallway
  • Install new wood beam ceiling

Bathroom
  • Gut bathroom
  • Install new drywall
  • Install tile shower and floors
  • Install new counter and sink in bathroom
  • Install shower door
  • Install shelving
  • Install wood beam ceiling

Bedroom
  • Install wood beam ceiling
  • Tile floors
  • Build a bed
  • Add door out to 3 season porch

3 Season Porch
  • Install tile floors
  • Frame out and install windows
  • Frame out and install 2 doors

On Saturday we started working on the small office/den, taking down the walls of an unused closet to open up the space, and beginning the process of framing over the cement wall. The basement is our winter project while the weather is bad and we are forced to stay indoors. I took a few "before" photos to share here. I'll continue to post images as we complete projects, and hopefully I'll be sharing some good "afters" in the spring!

Monday, December 17, 2012

Color Inspiration: Vera Neumann


Vera Neumann has been covered ad nauseum on the blog circuit, and while my personal taste leans toward simple and neutral, I still love her designs and could not resist making a collage and writing up a post.

The sheer number of prints, colors, patters, and items designed over the span of her career is remarkable, and her eye for color was impeccable. I love the way her designs are at the same time loose yet graphic, retro yet modern. Enjoy the eye candy!


More on Vera Neumann: 
Vera Neumann, Style Icon, Apartment Therapy  
Vera Neumann, Wikipedia     

Saturday, December 15, 2012

Self Watering Seed Starter Experiment

A month ago Josh ordered a variety of heirloom non-GMO seeds from California based company Sustainable Seed Co. We'll be starting some of the seeds this winter, and over the past few weeks Josh has built a "laboratory" of sorts in the basement to test a new seed starting technique.

The setup involves a fish tank, table, plastic tubing, water heater, grow light, water pump, absorbent cloth, wicks, plastic pipes, thermometer, hygrometer, and several layers of seed trays. The pump inside the fish tank pumps water through plastic tubing that runs up the table and into each of the seed trays before draining back down into the tank. Josh designed the setup to maintain a water level that keeps the soil moist without drowning the trays. A water heater keeps the water at the right temperature and a grow light provides "sunlight" for the seedlings in our somewhat dark basement. There is also a bit of "special sauce" to the setup that I won't divulge, partially because it is not yet perfected, and partially because it is not my invention to share.

It took a few days to get everything running correctly, but the setup has now been running continuously for about a week without issue, and the thyme and sage are already starting to break through the soil. We only have a few trays going now, but plan to have them all planted within a few months.

This winter we will test the system as a concept and start a few seeds to plant in the kitchen garden come spring. If it works well, we will reproduce the setup on a larger scale once we have the space (hopefully a greenhouse). We're also considering adding fish to the tank, which would provide extra nutrients for the plants as the water cycles through. A filter would be attached at the end of the drain pipe to eliminate excess fish waste as the water reenters the tank. The beauty of the system is that once it is up and running, minimal maintenance is required to start seeds as watering and fertilizing is automatic.

Above and below are a few pictures of the trial setup.


Thursday, December 13, 2012

Boston

I had a great five days in Boston, visiting with friends and hitting up my usual thrifting spots. During the trip I fit in five dinners with friends, a holiday party, Zumba class, gift shopping, brunch, two appointments, and hit up seven thrift stores. I also walked around my old neighborhood and checked out progress on the two new apartment buildings and hotel under construction on my old block. Between spending time with good friends and the energy of the city, I am invigorated.

But perhaps my favorite part of the trip was pulling back into our driveway in Vermont and realizing that it finally feels like home here. When I left Boston, a big part of me stayed there, and it has been a slow process becoming accustomed to life in the country. The first time we visited the city after moving to VT, it hit me hard that Boston still felt like home. Seeing the skyline had me taking shallow, quick breaths and fighting back tears. It is a strange thing to call an unfamiliar place home, and have no home in the one place you know like the back of your hand. Little by little, though, this tiny country town is becoming familiar, and most importantly Josh, Fern, and Riley are here. Wherever they are is where I want to be.

Me and Boston, we had a good run, but it's time to really embrace Vermont.

Boston Images (clockwise from top left): The Modern Theater on Washington Street, Emanuel Church on Newbury Street, The Hancock Tower, Trinity Church at Copley Square, Downtown Crossing,  Boylston Street holiday decorations, Church of the Covenant on Newbury Street, The Taj Hotel.

Friday, December 7, 2012

Boston Bound

I'm headed to Boston this afternoon to visit friends and do a little thrifting for a few days. Blog posts will resume next Thursday. Have a great weekend everyone!

Image Source

Thursday, December 6, 2012

The Grand Vision


How best to utilize the land is a constant topic of conversation in our house. Josh is really getting into the whole permaculture thing, and while mostly I just nod and say, "okay, that sounds good" when he launches into long explanations about nitrogen fixers, swales, and greenhouse best practices, I am definitely on board with using the land in productive but low impact ways.

Our ideas about how to set up food gardens and what structures to build change weekly, but the image above gives a rough idea (at least for this week!) of how we are planning to use the land. Some of the projects are quite ambitious, and will take years (if ever) to complete, while others are already underway.  A few additional projects we've been working on (the kitchen garden and forest gardens) are not included in this post because those areas are not in the photo.

The Pond
On the left edge of the grass, the land slopes down into a shallow, marshy basin. We are considering constructing a small pond site in this area. Pond water would be used to irrigate plants on the hillside and inside the greenhouse.

The Pergola
We would like to construct a simple pergola made from wood cut from our forest. The pergola will sit in front of the existing fire pit, and have room inside for a large table and chairs.

Stone Steps
Large flat stones gathered from our land will create steps down the hillside toward the pergola. Outdoor solar lights will illuminate the pathway.

The Greenhouse
Josh has been researching greenhouse plans, and would like to eventually build one on the flat area at the top of the hill. This spot receives good southern exposure, and the growing season would be extended for plants inside the greenhouse.

Chickens
As mentioned in this post, we would like to get a few laying hens for eggs and soil cultivation. We'll grow kale and swiss chard near the blueberry bushes on the hillside across from the stalls for chicken feed along with nitrogen fixing cover crops to enrich the soil. The chickens will graze the hillside, and their waste, combined with the cover crop nutrients, will eventually create fertile land for growing other types of food in the future.

The Orchard
This summer we planted 2 apples, 1 peach, and 1 plum tree on the lower portion of the far hill. We may add additional trees in the future.

??
Plans for the top portion of the far hillside are up in the air. That spot is somewhat shaded by the tree line, and does not get as much sun exposure as the hill closer to the house. For this reason we are holding off cultivating the back hill for the time being. Eventually we may cultivate the soil and grow shade crops.

Berry Bushes
Blueberries grow well in our area, especially in acidic soil like ours. We are planning to plant a few bushes on the hillside behind the greenhouse near the kale and swiss chard.

Wednesday, December 5, 2012

Marshall Studios Pottery

Last night I stumbled upon this vintage lamp by Marshall Studios, and soon after was on a roll browsing Marshall Studios pottery and lamps online. The pieces are beautifully simple, and immediately my interest was piqued to learn more about the company.

At the height of Marshall Studios in the 1950s and '60s, husband and wife team Gordon Martz and Jane Marshall were turning out 1000 handmade lamps a week. The couple met in college studying ceramics, and after graduation settled in Jane's home town of Veedersburg, Indiana to take over Jane's family's lamp business. Both skilled potters, the couple handmade original design lamps, pottery, tiles, and eventually furniture. The pieces were made by slip-casting, ram pressing, or jiggering, and everything was hand decorated.

In the 1980s and '90s, the mid century modern aesthetic was less popular, but today a pair of Marshall Studios lamps in good condition can run over a thousand dollars, and select pieces are on display at the Museum of Modern Art in New York.

Above, I've rounded up seven Marshall Studios pieces currently for sale on Etsy: (clockwise from top left) M77 Cruet, No. 191 Lamp, Walnut Lamp, Tea Cups, Pitcher, Pottery Set, Ceramic and Teak Lamp.  

Sources: Marshallstudios.net, University of MassachusettsJetsetmodern.com

Tuesday, December 4, 2012

DIY Natural Wood Napkin Rings

For Thanksgiving this year I decided to DIY a few pieces for the table, including a set of natural wood napkin rings made from a tree branch cut from the yard. They turned out well, so I have broken out the 7 DIY steps for creating your own set of 8 rings.

What you'll need:
Hardwood tree branch at least 2" in diameter and 16" long (use a longer branch for more rings)
Hand or electric saw
Drill and 1" drill bit
Sand paper
Hand knife
Wood oil

Directions:
1. Find a hardwood tree branch at least 2" in diameter and 16" long. Use a saw to cut the branch from the tree, then trim any smaller shoots coming off your branch.

2. Use a hand knife to strip the bark from the branch by using downward strokes angled away from your body.
3. Once your branch has been debarked, measure and mark 2" sections in pencil
4. Cut your branch into 2" sections with a hand or electric saw, then give each one a good sanding with a sanding block or loose sheet of sand paper
5. Drill holes in each section with an electric drill and 1" drill bit
6. Give each ring another sanding, then rub wood oil (I used Danish Oil in Natural) on each ring with a soft cloth. Apply additional coats as needed, allowing 24 hours between coats. For a smoother finish, sand the rings between each coat with 000 steel wool or 320 grit sandpaper.

7. Let your rings dry for 48 hours before use.

Monday, December 3, 2012

What Our Winter Looks Like

The past few days have been our first on the property in "real" snow, and I was surprised by the way a layer of snow completely transforms the feeling of this place. Last week everything was brown, dry, and dreary. Today, every turn is a picture postcard scene. I hate to use a cliché, but the phrase winter wonderland gets right to the heart of it.

I took a little thrifting trip on Saturday, and as I drove to town, Route 106 looked like a road I had never traveled before. Christmas had arrived overnight. Twinkling lights and holiday wreaths adorned every house, chimneys piped soft smoke into the frigid air, and a soft powdery blanket of snow covered everything. Snow has turned our town into the quintessential Vermont winter scene.

At some point I will take photos of the town, as it is quite something to see this time of year, but for now images from Sunday morning's property walk will have to do.


Sunday, December 2, 2012

Vintage Japanese Lantern Christmas Lights


While I certainly do not intend to write a dedicated post every time new items are added to the shop (that would get old and obnoxious pretty fast), I may post from time to time when something really special crosses my path.

Yesterday I came across these beautiful vintage glass Japanese lantern lights and for some reason I am just smitten with them. Each bulb is hand painted with a different design, and when illuminated they give off the nicest glow. The bulbs are even textured to replicate the look of the paper and wood accordion structure of a real Japanese lantern.

The bulb threads are the same size as standard Christmas lights, so they can easily be swapped in on an existing string. I was tempted to keep them for myself, but at the same time couldn't wait to photograph and display them in the shop. I am hoping someone who loves them as much as I do snatches them up and proudly displays them over a window, mantle, or tree.

Saturday, December 1, 2012

Happy December

Happy first day of December, everyone! As if on queue, the snow is falling quietly here in Vermont.


Friday, November 30, 2012

Little Dog Vintage is Open Again!

After three months of moving from the city to the country and renovating a new work space, my vintage shop is open for business once again! It will take a month or two to photograph and list all of my stock, but it felt great to take the vacation notice down and list those first few items. I've set a goal for myself to list 75-100 items over the next few months.

As some of you know, in August I left Boston and my job at Google to pursue my vintage shop full time and live a more sustainable life in Vermont. For me, the shop reopening represents a huge step towards realizing that dream.

Stop by to check out the shop or share the link with your vintage loving friends if you are so inclined :)


Thursday, November 29, 2012

Our Thanksgiving

Last Thursday we survived a rite of passage -- hosting our first Thanksgiving! My parents flew out from California, and Josh's family drove up from Boston, making a total of five Thanksgiving guests.

I really wanted the day to be comfortable and fun for everyone, so I set to work on the details in early November, making giant grocery lists, and tracking down a turkey roasting pan, thermometer, baster, ice bucket, linen napkins, and table runner. I thrifted large serving platters, app trays, and a gravy boat. My vintage wood candle sticks came out of storage and sprigs of evergreen and winter berries from the yard were arranged in old ceramic vases. I rubbed a coat of Danish Oil on our shaker dining room chair set to freshen them up, then spackled and painted the dings in our kitchen wall.

We bought and wrapped small gifts for each person attending, including a birthday gift for Josh's sister, whose birthday was on Thanksgiving! Natural wood napkin rings were made from hardwood branches cut from a tree behind the house, and a small sapling was cut and inserted into a salvaged wood base to make a rustic centerpiece for the food table. Small glass globes holding votive candles were hung on the branches for soft lighting in the evening.

In the end, everything went just as planned and we had the best day, and I would not mind if this were the start of a yearly tradition :)

I hope all of you had an equally wonderful Thanksgiving with lots of family, friends, turkey, and pumpkin pie!


Photos: Gerry Puhara

Wednesday, November 28, 2012

Little Dog Vintage Sneak Peek

  
Now that Thanksgiving is over (we hosted this year, so it's been a scramble for the past week) and my photo setup is complete, I'm finally able to start photographing the 100+ vintage items I've been hoarding for the reopening of my vintage shop.  It's been a bit of trial and error to find the best spot for natural lighting, but today I had a breakthrough and am starting to like the photos. The above photos were taken in the barn today, and I am sharing them as a sneak peek of things to come!

[clockwise, from top left: canvas and metal camp stool, resin glove molds, plaster horse bust, sputnik lamp, Japanese box with fold-out mirror, mid century double shade lamp]

Monday, November 26, 2012

First Dusting


We returned home from Boston last night to find our hillside covered with the first dusting of snow to stick this season. I took the dogs for a walk around the hill this morning and snapped a few shots.


Tuesday, November 20, 2012

Little Dog's New Photo Setup

One of the most important aspects of running an online shop is photography. The simple truth is that shops with beautiful product photographs sell more and receive more features.

For months I've been planning to make a neutral background wall with weathered wood table base to use for my shop photos, and this week we finally finished the display.

The new product photo setup includes:
1) A large wall on a rolling base for the background
2) An old weathered barn door attached to rolling wood beam table legs for the base
3) A large sheet of drywall leaned up against the left side of the display to reflect light coming from the window on the right back into the setup.

The large wall background will allow me to photograph larger items easily (maps, rugs, etc.) and the rolling base means I can move the setup around the workshop to capture the best natural light. The long wood table will be pushed against the wall to provide the base surface for the photographs, and the wheels allow it to move with the wall around the room. Here's how we built the wall and table (please excuse my fuzzy iPhone snapshots):

The Background Wall

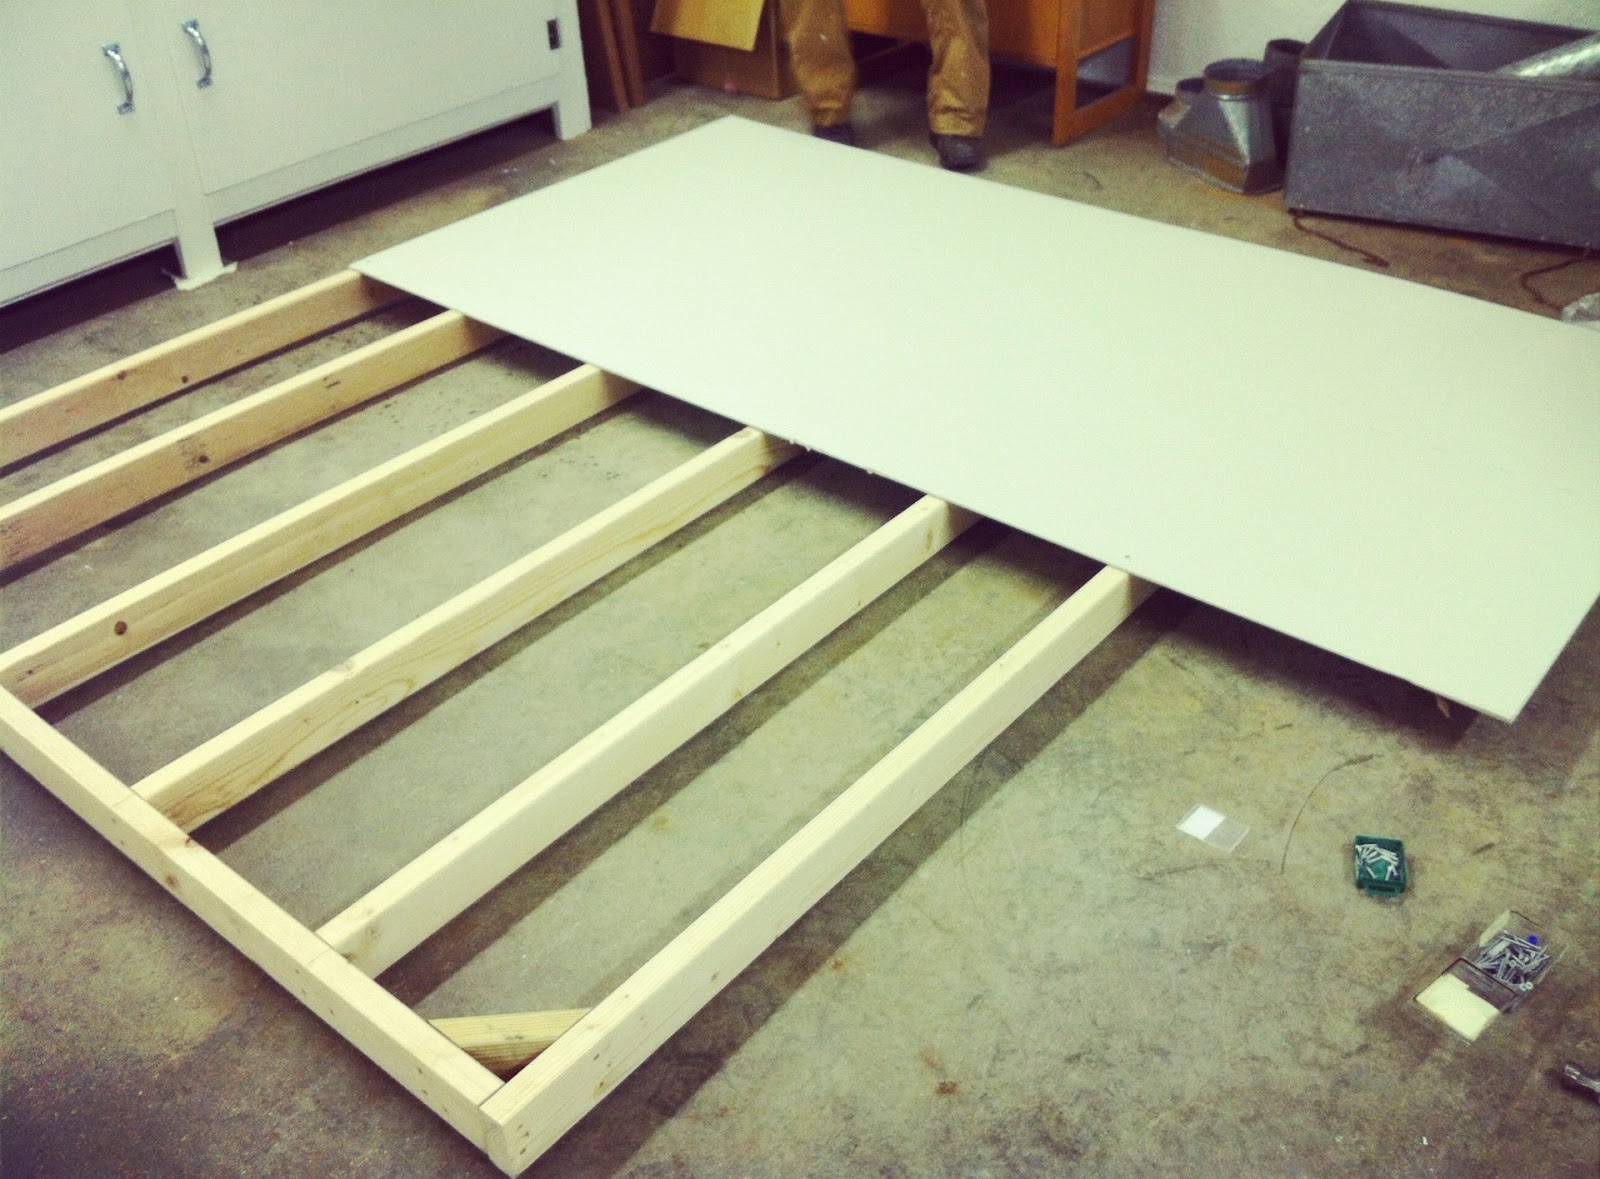
First, we built the frame for the wall with 2x4s.


Then we screwed two pieces of drywall to the frame and cut off the edges that ran over the side of the frame.


Once both pieces of drywall were attached, we set to work making the rolling base using heavy pieces of salvaged wood from the burn pile at the dump. We added 6 wheels to the bottom to allow the base and wall to roll around the room.


Next, we attached the framed wall to the base.


And finally I mudded the drywall seam and screw holes, then painted the whole thing a neutral color.

The Table

I searched high and low until I found a weathered old barn door with just the right amount of wear, then removed the hinges, door handle, and latch hardware.


We cut a 4" x 4" wood beam from Home Depot into 4 sections for the legs, and attached them to the barn door with brackets and corner braces


Wheels were added to the bottom of the legs, then I gave the legs a coat of neutral paint.


And there you have it!


Now that the display has been built, I'll be rephotographing my existing shop stock with the new setup in addition to taking first time photos of the new items I've acquired over the past 4 months. In total, I have about 120 items to photograph so it will take me a while to get through them all. I will probably reopen the shop with about 20-30 items and continue photographing and listing over time. Once Thanksgiving is over (we're hosting both Josh & my family this year), I'm heading straight to the barn to work on photos!

Wednesday, November 14, 2012

Workshop Stove Up and Running!

Last week we finally got our hands on all of the necessary parts to install a flue for our stove, and by the end of the week it was up and running. My fingers no longer freeze while I am working on projects in the barn (yippee!) and the smell of burning birch logs is quite cozy.

In addition to installing the flue, we also used 000 steel wool to shine and clean the metal hardware on the stove and gave the body a coat of black stove paint. The whole setup looks pretty sharp if I do say so myself.

The cabinets and walls inside the barn have also been painted, and the photo display setup is almost done. More photos to come soon!